Archive
Using ShixxNOTE 7.net communication options 📨
Advanced communication options 🎓
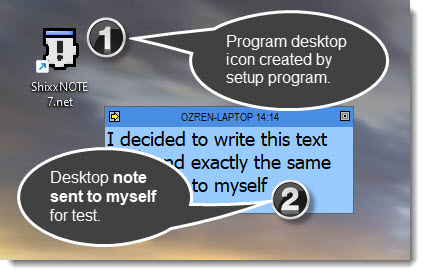
If you read previous article and you have finished program installation then you will get new ShixxNOTE 7.net icon on your desktop. Double click on it and lets go.
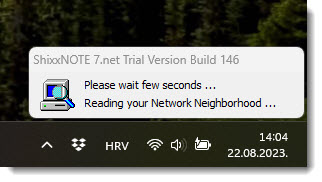
Before you get new desktop sticky notes on your desktop one program thread will scan your network (LAN) searching for all computers in it. If you have big network than please be patient. Program is reading your network neighborhood and it will find all devices in it, but don’t worry program need only computers 🖥️💻 with IP address to work properly. Depending on your network size this dialog will be shown in your lower desktop corner maybe few seconds or more but not more than 2 minutes. In a company with 20 computers scanning will be finished in a few seconds. New ShixxNOTE 7.net program version have new scanning function which is 2 or 3 times faster 💫 than 6.net version.
After “Reading your Network Neighborhood” dialog disappear you will get one default note without text in top left corner of your main desktop monitor. Than you can write ✍️ whatever you want in it. Change note colour, note font, paragraph settings, set alarm and expiration time 🕖, etc. Because this is not simple plain text be aware if you copy text from some web page and paste content in desktop note, because you will get all font and paragraph settings also. Every desktop note have Rich Text Format control therefore you can save note as Word document.
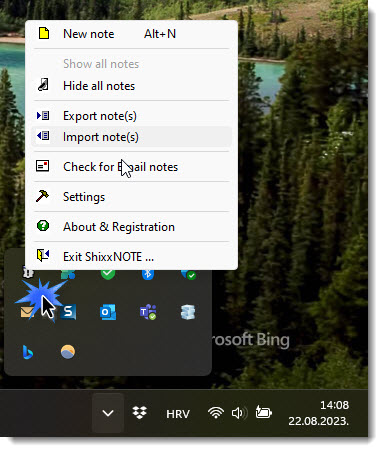
But first lets check out main program menu. Right mouse click on program tray icon and you will get main program menu. Below you can see on the image what it looks like and what you can change in program settings. There are “General settings”, “Default note settings” and “Network settings”. In this article I will show you for me most valuable network settings and what you can do with it.
After you click on “Settings” in main program menu you will get dialog with plenty of options. Right now I will explain tab “Network settings” where you can see what program read on the startup.
As you can see “Network neighborhood” list is filled with all computers which program read on startup. For every computer name you can also check out what IP address it have. Righ mouse click on computer name and select in small menu “Show IP address”.
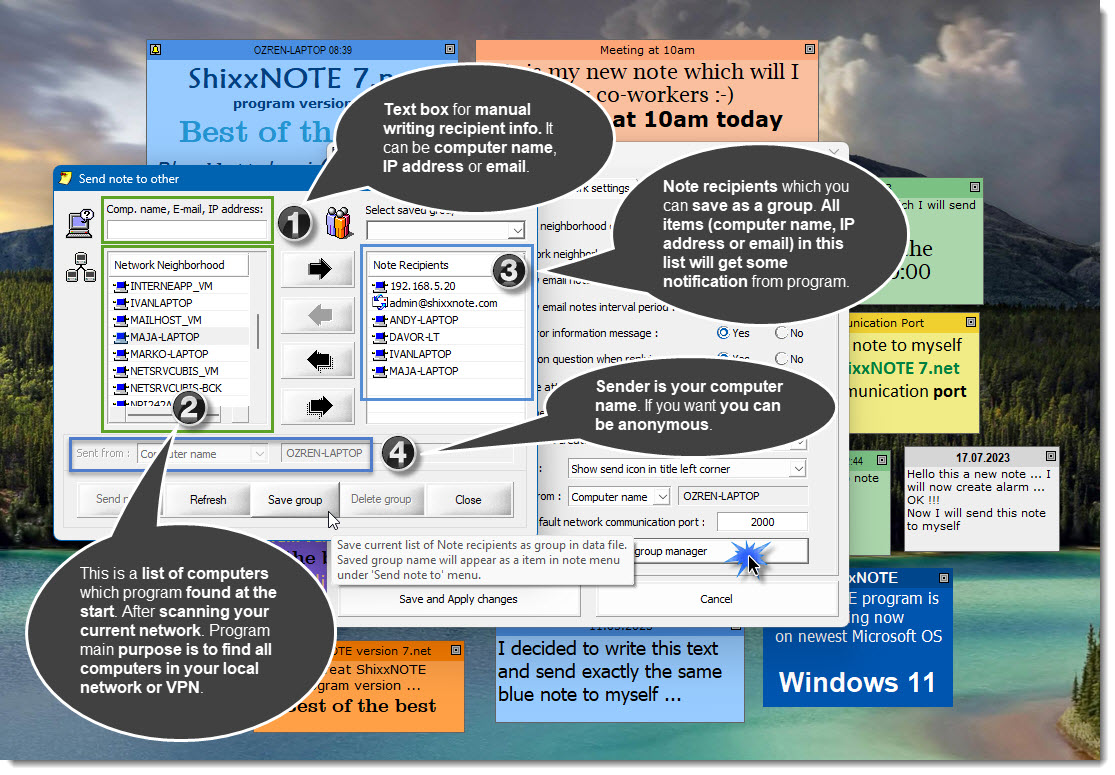
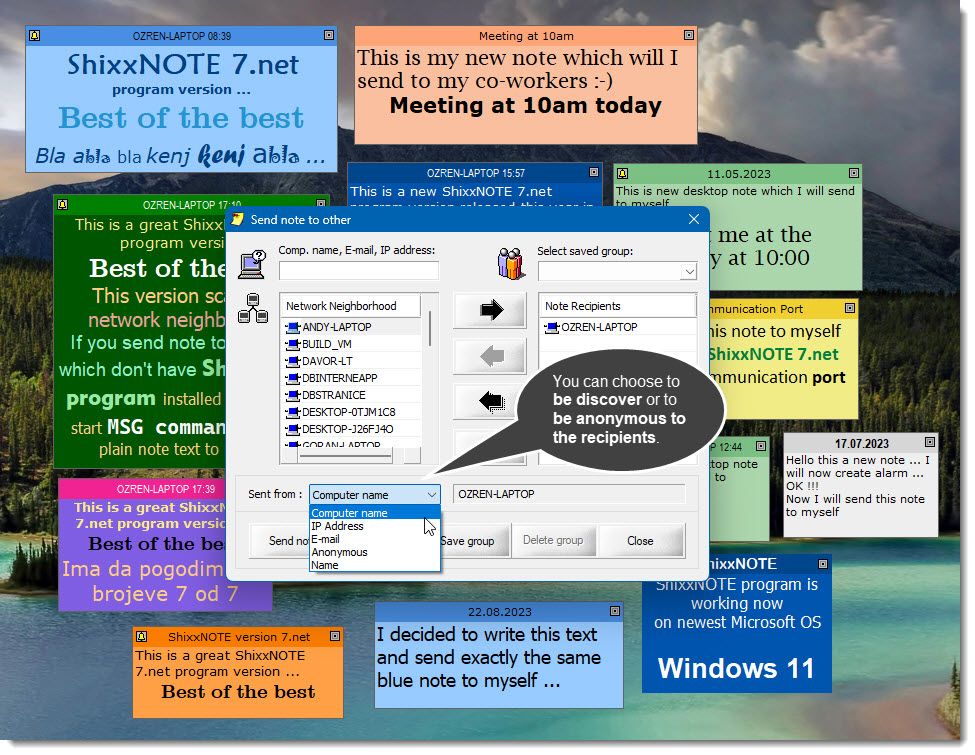
Everything is explained on image above. I clicked on “Network and group manager” to see computer names in network neighborhood list and also to create group of recipients which can be saved. As you can see in “Note recipients” I added few computer names, IP address of one computer and one email address. That are all channels for sending and receiving notes in ShixxNOTE 7.net program. For advanced users you can change default program communication port “2000” to another one. Be carefull if you don’t know nothing about ports. If you do know then you can change port to e.g. “33557” 🔑. Please don’t enter ports which are used by Operating System 🚫 communication like TCP/IP “http” protocol which is “80” or “https” port “443”. Do that on an another computer with ShixxNOTE 7.net program installed. I mean change port also to “33557” 🔑. WOW. Now you have secured communication TCP/IP protocol set. Nobody will know what you are sending to your colleague. Off course don’t tell nobody which port you are using for communication. This can be used for secret communication.
Everything is explained on image above. I clicked on “Network and group manager” to see computer names in network neighborhood list and also to create group of recipients which can be saved. As you can see in “Note recipients” I added few computer names, IP address of one computer and one email address. That are all channels for sending and receiving notes in ShixxNOTE 7.net program. For advanced users you can change default program communication port “2000” to another one. Be carefull if you don’t know nothing about ports. If you do know then you can change port to e.g. “33557”. Please don’t enter ports which are used by Operating System communication like TCP/IP “http” protocol which is “80” or “https” port “443”. Do that on an another computer with ShixxNOTE 7.net program installed. I mean change port also to “33557”. WOW 💬. Now you have secured communication TCP/IP protocol set. Nobody will know what you are sending to your colleague. Off course don’t tell nobody which port you are using for communication. This can be used for secret communication 🤫.

This is my desktop filled with ShixxNOTE 7.net desktop sticky notes. I can hide notes if I want and lock them with password. But this I will explain in another article. Till then be brave and use ShixxNOTE 7.net. Try all functionality for 30-days which is program trial period. If you like it register program just for 24.99 USD 💵💶.
Best regards,
ShixxNOTE program author
ShixxNOTE 7.net new price is 24.99 USD 💰
New ShixxNOTE 7.net version released in March 2022 Build 146 now costs 24.99 USD for everybody. Price is no more based on how many computers you will install your ShixxNOTE 7.net program. You can install it on 10 computers in your company LAN and also for example on 4 computers at your home.
Before program was checking how many computers in your LAN have ShixxNOTE installed. Because program is always listening on port 2000 for new note data it was easy for me to calculate how many installations my customer did. Now there is no limit and program doesn’t scan network to calculate how many computers have ShixxNOTE installed.

I hope you will now register new ShixxNOTE 7.net after 30-days of trial period. Program now works perfectly on all Windows versions including newest Windows 11. Off course you can install program on Windows XP and send note to some computer which have Windows 10 installed. Everything works perfectly.
Best regards,
Ozren Sirola
ShixxNOTE program author
Windows Firewall Issue
Hello,
Many times my customers write me after they have purchased program. Common reason is that some computers can send and receive note and some computer(s) can only send or only receive note. I always reply to my customers and write them to make sure that Windows Firewall settings are correct, meaning that ShixxNOTE program have opened default port 2000 for communication. So you can open default port 2000 or gave permission to ShixxNOTE program in Windows Firewall settings. This is always happening because when customer install program on a computer and then start program for the first time, Windows Firewall dialog prompts and they doesn’t know what to click on it.
So now I will put Windows Firewall images and what customer or simple 30-days trial user must click when program is installed and started first time on the computer. If you install program on Windows XP then you will get this dialog where you must click on the Unblock button like on an image below.

If you are installing ShixxNOTE on Windows 7 or Windows 10 you will get again Windows Firewall dialog where you must click on Allow Access button like on an image below.

If you do this at the program first start up you will have no problems later with sending or receiving notes.
Kind regards,
Ozren Sirola
ShixxNOTE program author
Make ShixxNOTE icon to appear on the TaskBar
Hello folks,
If you have Windows 10 with latest update (I stopped counting how many times I had to update my OS) installed on your computer, than I would like to show you how to make ShixxNOTE icon visible in your taskbar.
Microsoft release update and than you have to uninstall VPN client just to get network That is my example. So now I am scared when I see that new Update is available 🙂 But lets just put ShixxNOTE icon always visible.
First you need to right mouse click on taskbar and select Taskbar settings i tem from menu. That item has this image beside.
After that you will get this image where you have to click on “Select which icons appear on the taskbar”.

Then you only need to set ShixxNOTE icon to On. After that and after every next Windows 10 start up you will see ShixxNOTE icon in the corner 🙂

Kind regards,
Ozren Sirola
Create new note on Windows 10
Hello,
In my last article I wrote that ShixxNOTE is now Windows 10 Compatible and that you can find it on Windows Store. From Windows Store you can download 30-days trial version and you can also buy 25-Users License for 25.00 USD. If you didn’t know that now you know. But there is one problem. When you install app from Windows Store and when you get program icon in your Windows 10 Start Menu you will get only small ShixxNOTE icon in taskbar located near clock. Also after you restart computer you must again start program from Start Menu. Old installation had put ShixxNOTE shortcut in your Start Up menu and you wouldn’t notice that ShixxNOTE application is started.
If you install program from Windows Store you can do also everything for 30 days trial period. But on every computer start you must manually start program and click program icon or tile in Windows 10 Start Menu. Here is the picture of my Windows Start menu and ShixxNOTE tile.

Soon I will release on Windows Store new version which will start ShixxNOTE program on computer start up. I will announce that on program ShixxNOTE Program Homepage and here. But if you had install program from Windows Store or you have install program from program download page and started program setup, I must explain to users how you will create new note.
When you start ShixxNOTE you will see Splash screen and then nothing. But you will get new program icon in your task bar located near the clock. Like on the picture bellow.

Many of my users doesn’t know how to create note after they see splash screen they don’t notice this small icon. Maybe in new version I will create some welcome default note. But if you want to create note you just need to double click on program icon. Second way to create note is to right mouse click on program icon and then you will get main program menu, from there you simply select option “New note”. Here on the picture below you can see some previously created notes and main ShixxNOTE program menu.

I hope now first time users will know how to create note(s) and after that send them across your LAN in your office 🙂
Kind regards,
Ozren Sirola
ShixxNOTE program author
New Program Home Page
Before one month finally I decided to create and publish new ShixxNOTE Program Home Page site on same URL: www.shixxnote.com
New web site is ASP.NET web application but I don’t need to much of .NET Framework so I just used HTML5, CSS and some JavaScripts to make site cool and refreshing. I also left link to old site but I think soon I will remove it. I hope you like it 🙂
Here are some screen shots of it bellow.
Kind regards,
Ozren Sirola

Recent Comments