Archive

Using ShixxNOTE 7.net communication options 📨
Advanced communication options 🎓
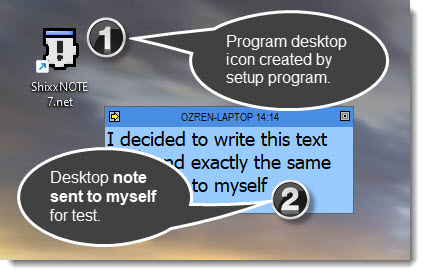
If you read previous article and you have finished program installation then you will get new ShixxNOTE 7.net icon on your desktop. Double click on it and lets go.
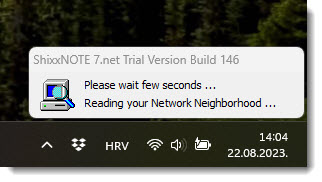
Before you get new desktop sticky notes on your desktop one program thread will scan your network (LAN) searching for all computers in it. If you have big network than please be patient. Program is reading your network neighborhood and it will find all devices in it, but don’t worry program need only computers 🖥️💻 with IP address to work properly. Depending on your network size this dialog will be shown in your lower desktop corner maybe few seconds or more but not more than 2 minutes. In a company with 20 computers scanning will be finished in a few seconds. New ShixxNOTE 7.net program version have new scanning function which is 2 or 3 times faster 💫 than 6.net version.
After “Reading your Network Neighborhood” dialog disappear you will get one default note without text in top left corner of your main desktop monitor. Than you can write ✍️ whatever you want in it. Change note colour, note font, paragraph settings, set alarm and expiration time 🕖, etc. Because this is not simple plain text be aware if you copy text from some web page and paste content in desktop note, because you will get all font and paragraph settings also. Every desktop note have Rich Text Format control therefore you can save note as Word document.
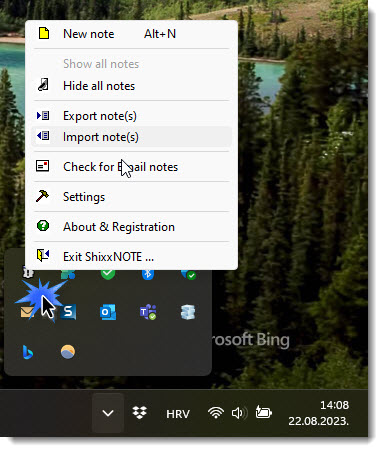
But first lets check out main program menu. Right mouse click on program tray icon and you will get main program menu. Below you can see on the image what it looks like and what you can change in program settings. There are “General settings”, “Default note settings” and “Network settings”. In this article I will show you for me most valuable network settings and what you can do with it.
After you click on “Settings” in main program menu you will get dialog with plenty of options. Right now I will explain tab “Network settings” where you can see what program read on the startup.
As you can see “Network neighborhood” list is filled with all computers which program read on startup. For every computer name you can also check out what IP address it have. Righ mouse click on computer name and select in small menu “Show IP address”.
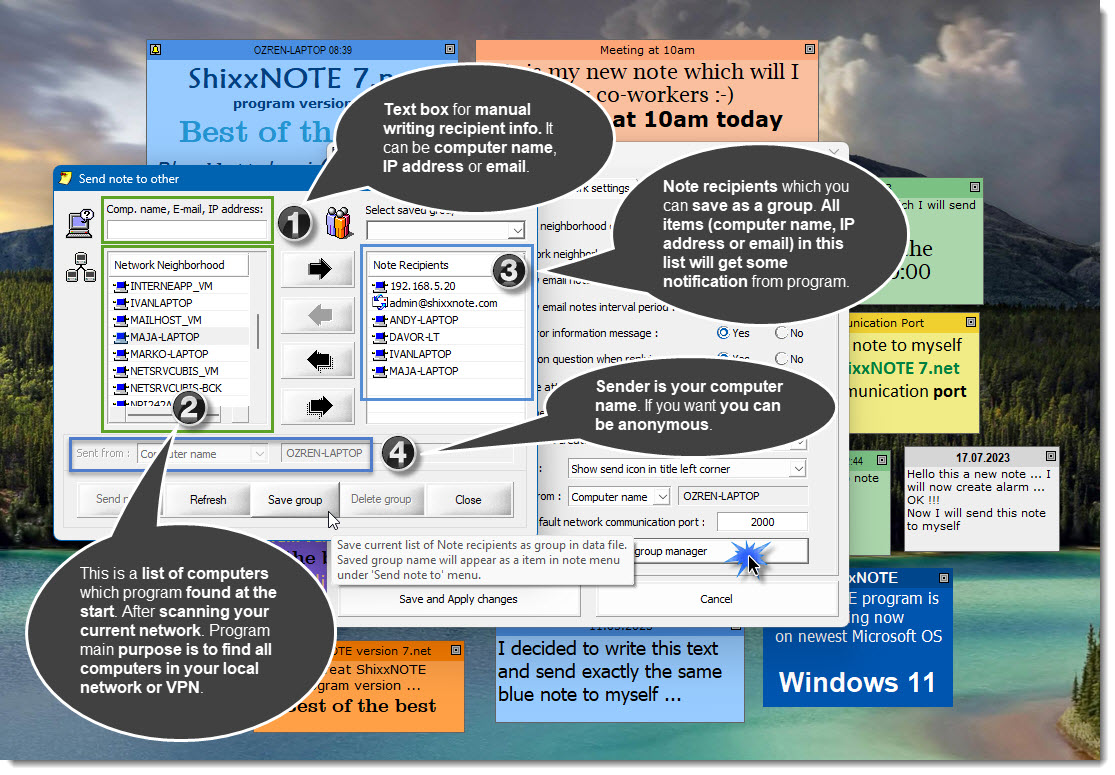
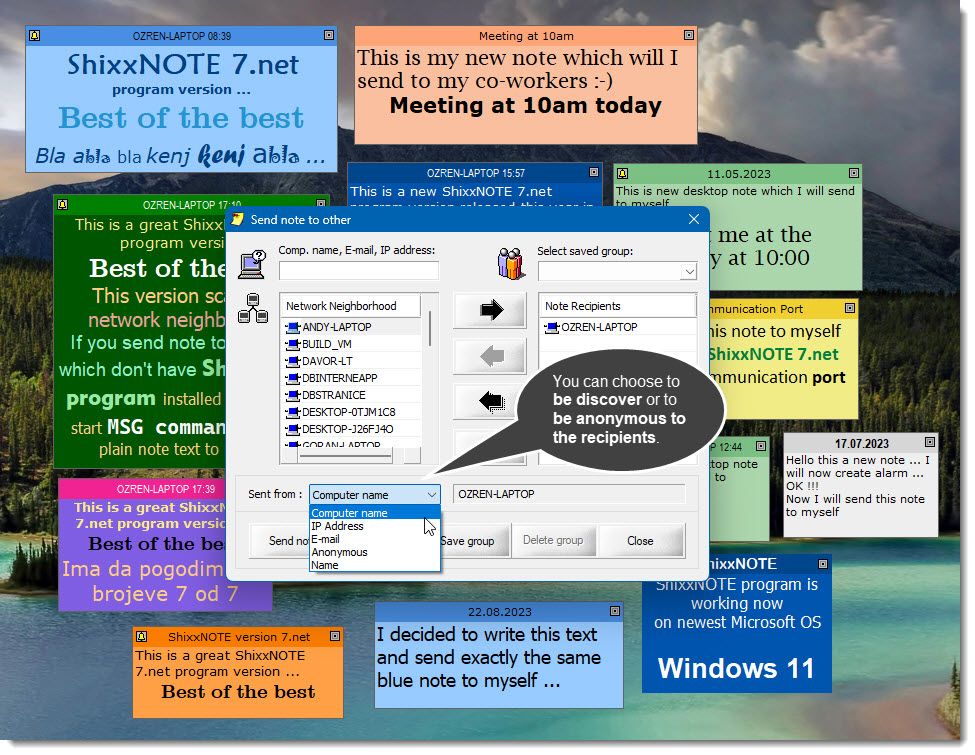
Everything is explained on image above. I clicked on “Network and group manager” to see computer names in network neighborhood list and also to create group of recipients which can be saved. As you can see in “Note recipients” I added few computer names, IP address of one computer and one email address. That are all channels for sending and receiving notes in ShixxNOTE 7.net program. For advanced users you can change default program communication port “2000” to another one. Be carefull if you don’t know nothing about ports. If you do know then you can change port to e.g. “33557” 🔑. Please don’t enter ports which are used by Operating System 🚫 communication like TCP/IP “http” protocol which is “80” or “https” port “443”. Do that on an another computer with ShixxNOTE 7.net program installed. I mean change port also to “33557” 🔑. WOW. Now you have secured communication TCP/IP protocol set. Nobody will know what you are sending to your colleague. Off course don’t tell nobody which port you are using for communication. This can be used for secret communication.
Everything is explained on image above. I clicked on “Network and group manager” to see computer names in network neighborhood list and also to create group of recipients which can be saved. As you can see in “Note recipients” I added few computer names, IP address of one computer and one email address. That are all channels for sending and receiving notes in ShixxNOTE 7.net program. For advanced users you can change default program communication port “2000” to another one. Be carefull if you don’t know nothing about ports. If you do know then you can change port to e.g. “33557”. Please don’t enter ports which are used by Operating System communication like TCP/IP “http” protocol which is “80” or “https” port “443”. Do that on an another computer with ShixxNOTE 7.net program installed. I mean change port also to “33557”. WOW 💬. Now you have secured communication TCP/IP protocol set. Nobody will know what you are sending to your colleague. Off course don’t tell nobody which port you are using for communication. This can be used for secret communication 🤫.

This is my desktop filled with ShixxNOTE 7.net desktop sticky notes. I can hide notes if I want and lock them with password. But this I will explain in another article. Till then be brave and use ShixxNOTE 7.net. Try all functionality for 30-days which is program trial period. If you like it register program just for 24.99 USD 💵💶.
Best regards,
ShixxNOTE program author
ShixxNOTE 7.net is released
Today in March 2022, new program version ShixxNOTE 7.net Build 146 is released. After many years finally program again at the start, scan your network neighborhood for other computers. So now when you go to Send note to others dialog you will see in Network Neighborhood list all computer names which program found. After you select and add computer name it will go to Recipients List. In Recipient List you can add not only computer name, but also you can add IP address or email address. If you have email address in recipients list, program will ask your permission to run you mail client and then will send ShixxNOTE email note which contain note data (note color, title color, formatting, note text, etc.).

As you can see ShixxNOTE 7.net works normally on latest Microsoft Windows 11. Main settings dialog now looks different. To refresh dialog new images are added. From main program menu (right mouse click on program try icon) select “Settings” and you will get General, Default note and Network settings dialog. There you can change how program will behave.

Network settings are important for users who like to send note to others. There you can change main ShixxNOTE 7.net program communication port 2000 to some other. Use this settings carefully. Also you can send note anonymously if you change option Default sent from option in Network settings dialog. After that when note is send recipient will not see from who it is. But recipient will then not able to reply to sender. If you like to fool somebody be anonymous.

Price for registered ShixxNOTE 7.net version is 24.99 USD. If you buy program you can install it on every Windows computer in your network neighborhood and setup ShixxNOTE network of computers. Then sending and receiving notes to other colleagues in your company for instance is so simple and easy. Hope you will enjoy my program and hope you will register it 🙂
Best regards,
Ozren Sirola
ShixxNOTE 7.net program author
ShixxNOTE 7.net announcement
Current version for download is ShixxNOTE 7.net and it is the version without multiple users license discount. Now there is only one version for download. Price for registration of current version ShixxNOTE 7.net is 49.95 USD and it will be just one price from now. But instead of multiple license versions this version you can install on all computers in you network neighborhood.

This year new code for scanning network neighborhood will be implemented in program. Scan will start at the program start and will save all found computer names in your network neighborhood in one file. After that when you want to Send note to other your Network neighborhood list will be populated from that file.
Best regards,
Ozren Sirola
Windows Firewall Issue
Hello,
Many times my customers write me after they have purchased program. Common reason is that some computers can send and receive note and some computer(s) can only send or only receive note. I always reply to my customers and write them to make sure that Windows Firewall settings are correct, meaning that ShixxNOTE program have opened default port 2000 for communication. So you can open default port 2000 or gave permission to ShixxNOTE program in Windows Firewall settings. This is always happening because when customer install program on a computer and then start program for the first time, Windows Firewall dialog prompts and they doesn’t know what to click on it.
So now I will put Windows Firewall images and what customer or simple 30-days trial user must click when program is installed and started first time on the computer. If you install program on Windows XP then you will get this dialog where you must click on the Unblock button like on an image below.

If you are installing ShixxNOTE on Windows 7 or Windows 10 you will get again Windows Firewall dialog where you must click on Allow Access button like on an image below.

If you do this at the program first start up you will have no problems later with sending or receiving notes.
Kind regards,
Ozren Sirola
ShixxNOTE program author
Make ShixxNOTE icon to appear on the TaskBar
Hello folks,
If you have Windows 10 with latest update (I stopped counting how many times I had to update my OS) installed on your computer, than I would like to show you how to make ShixxNOTE icon visible in your taskbar.
Microsoft release update and than you have to uninstall VPN client just to get network That is my example. So now I am scared when I see that new Update is available 🙂 But lets just put ShixxNOTE icon always visible.
First you need to right mouse click on taskbar and select Taskbar settings i tem from menu. That item has this image beside.
After that you will get this image where you have to click on “Select which icons appear on the taskbar”.

Then you only need to set ShixxNOTE icon to On. After that and after every next Windows 10 start up you will see ShixxNOTE icon in the corner 🙂

Kind regards,
Ozren Sirola
Create new note on Windows 10
Hello,
In my last article I wrote that ShixxNOTE is now Windows 10 Compatible and that you can find it on Windows Store. From Windows Store you can download 30-days trial version and you can also buy 25-Users License for 25.00 USD. If you didn’t know that now you know. But there is one problem. When you install app from Windows Store and when you get program icon in your Windows 10 Start Menu you will get only small ShixxNOTE icon in taskbar located near clock. Also after you restart computer you must again start program from Start Menu. Old installation had put ShixxNOTE shortcut in your Start Up menu and you wouldn’t notice that ShixxNOTE application is started.
If you install program from Windows Store you can do also everything for 30 days trial period. But on every computer start you must manually start program and click program icon or tile in Windows 10 Start Menu. Here is the picture of my Windows Start menu and ShixxNOTE tile.

Soon I will release on Windows Store new version which will start ShixxNOTE program on computer start up. I will announce that on program ShixxNOTE Program Homepage and here. But if you had install program from Windows Store or you have install program from program download page and started program setup, I must explain to users how you will create new note.
When you start ShixxNOTE you will see Splash screen and then nothing. But you will get new program icon in your task bar located near the clock. Like on the picture bellow.

Many of my users doesn’t know how to create note after they see splash screen they don’t notice this small icon. Maybe in new version I will create some welcome default note. But if you want to create note you just need to double click on program icon. Second way to create note is to right mouse click on program icon and then you will get main program menu, from there you simply select option “New note”. Here on the picture below you can see some previously created notes and main ShixxNOTE program menu.

I hope now first time users will know how to create note(s) and after that send them across your LAN in your office 🙂
Kind regards,
Ozren Sirola
ShixxNOTE program author
Discount on program price
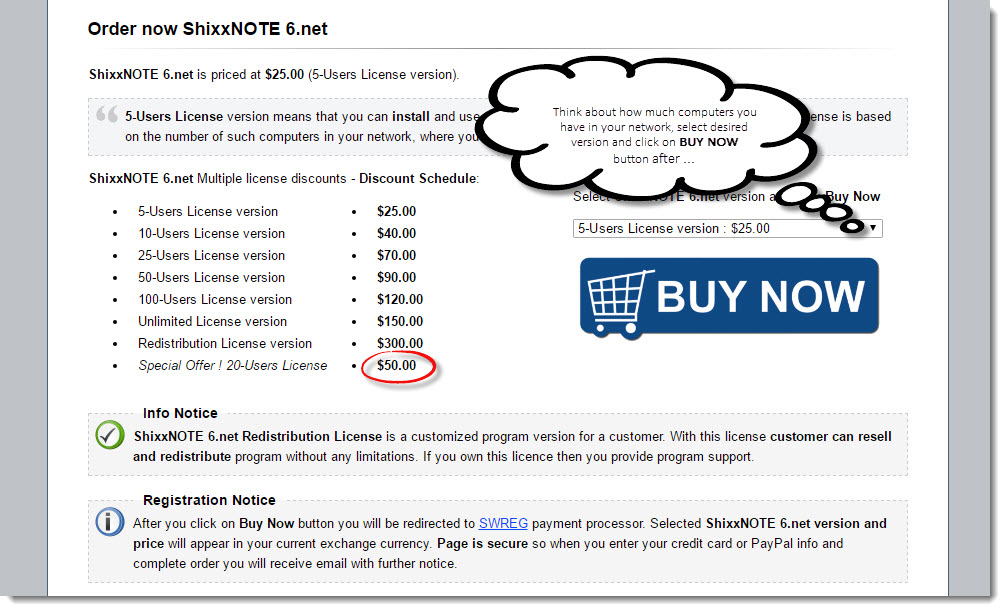
I’ve created ShixxNOTE program before almost 12 years ago. First awarded version was ShixxNOTE 4.net. Program was published on DVD by croatian BUG magazine specialized for computers, gadgets and shareware programs. Back then BUG magazine rated my program with 10/10. Now after so many years and many changes in the program, I decided to put discount on ShixxNOTE 6.net program price. So check program order page and purchase your version 🙂
I hope you will appreciate this.
Kind regards,
Ozren Sirola
Installing program on Windows 10
When you start ShixxNOTE setup file on Windows 10 you will get dialog below saying that “Windows protected your PC”. Windows SmartScreen prevent setup to start ?! And also it scares you with this sentence “Running this app might put your PC at risk”. This is not correct. ShixxNOTE setup file is 100% safe and I can assure you that your PC will not be in any risk if you start setup file. Why Microsoft put ShixxNOTE setup file in risk group is because now they only trust recognized apps to run. Which means that app must be checked by Microsoft and be created to pass all theirs validation. This is new thing in Windows 10, before in Windows 7 or Windows XP there was nothing to scare you. If you want to install ShixxNOTE 6.net on your PC you must do the following. Check this images and read the text I wrote in green box 🙂
On first dialog you have to click on “More info” link.

On second image you have to click on button “Run anyway” and program setup will start. After that you will have ShixxNOTE 6.net installed on your computer 🙂

I am sorry for this but Microsoft decided that my program setup file is unrecognized. But don’t worry my program is 100% safe and if any of you who installed ShixxNOTE 6.net Trial version or Registered version have some problems after installing program please write comment.
Now I am little worried because people belive Microsoft rather than me, Ozren Sirola, ShixxNOTE program author. So now I am loosing my potential customers just because users are affraid or they doesn’t know that they must click on “More info” and then “Run anyway” button.
I hope this article and ShixxNOTE reputation (listed on English Wikipedia) will assure you that program is perfectly safe.
Kind regards,
Ozren Sirola
ShixxNOTE program author

Recent Comments